


A Guide to Sourdough Bread


Sourdough bread is a marvel of the baking world that has captivated the hearts of culinary enthusiasts for its unique flavor, texture and health benefits. Unlike regular bread, which relies on commercially produced yeast for leavening, sourdough utilizes a “starter” — a fermented mixture of flour and water that contains wild yeast and bacteria.
This fermentation process helps the bread rise. More importantly, it imparts a characteristic tangy flavor and creates a bread that's more digestible and nutritious.
What Makes Sourdough Different?
The key difference between sourdough and regular bread lies in the fermentation process. The natural fermentation of sourdough starter breaks down gluten and sugars, producing bread that many find easier to digest.
The fermentation process also produces lactic acid, which gives sourdough a distinctive tangy flavor. This acid helps to naturally extend the shelf life of sourdough bread without the need for preservatives.
Sourdough bread also has a distinctive crust, typically more robust and chewier than typical bread loaves. The sourdough crust contrasts beautifully with its soft, airy interior.
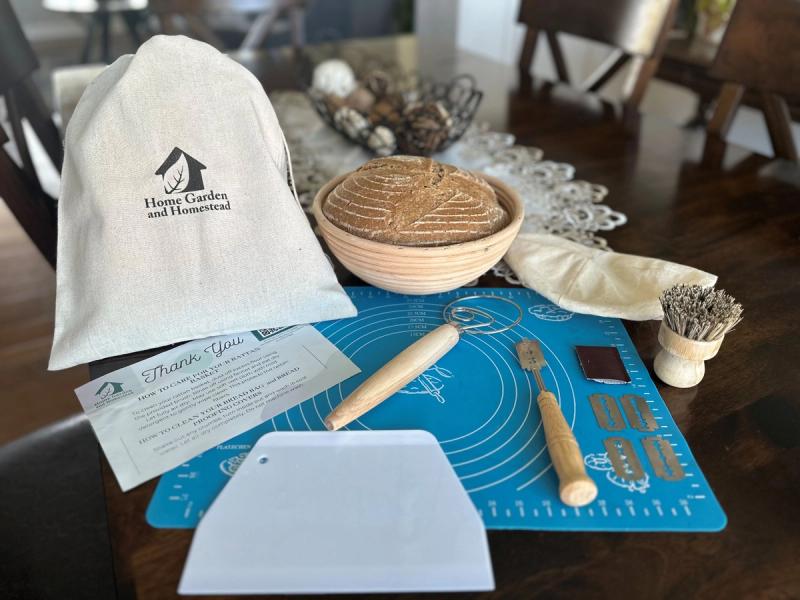
Essential Tools and Ingredients
To embark on your sourdough journey, you will need the following tools and ingredients:
- Sourdough Starter: You can either obtain this from another baker or create your own by mixing equal parts flour and water and letting it ferment over several days. (There are lots of videos on YouTube that will guide you through this process.)
- Flour: Unbleached bread flour works best. You may also experiment with whole wheat or rye varieties for different flavors.
- Water: Use filtered water to avoid the chlorine typically found in tap water, which can hinder the growth of your starter. (If using tap water, let it sit out for at least 30 minutes to dissipate the chlorine).
- Salt: Enhances flavor and regulates yeast activity.
- Digital Scale: This is essential for measuring ingredients accurately.
- Mixing Bowls: Needed to mix your dough.
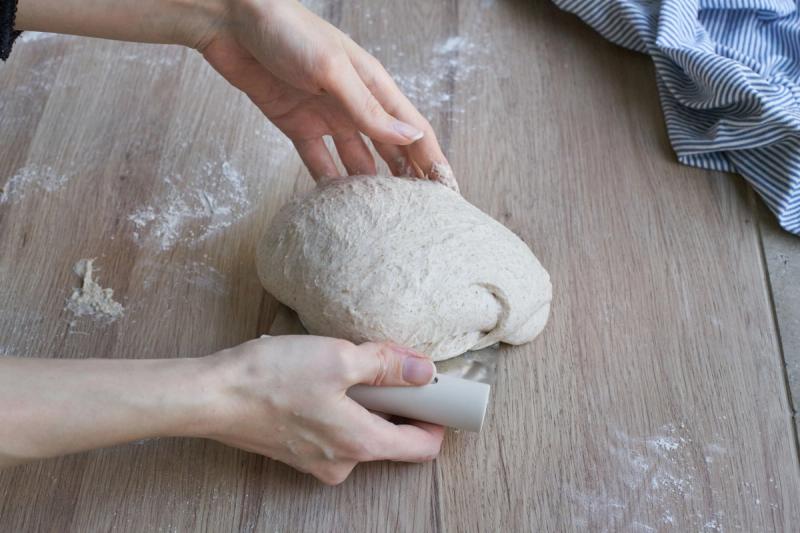
- Dough Scraper: Helps with handling and folding the dough.
- Proofing Basket: Provides shape and structure to the dough as it rises.
- Dutch Oven or Baking Stone: Critical for achieving a crispy crust and even baking.
- Oven Thermometer: Ensures your oven is at the correct temperature, as many ovens are inaccurately calibrated.
Making Your Sourdough Bread
- Creating or Refreshing Your Starter: If you're making your starter, mix equal parts of flour and water in a jar and leave it at room temperature. Feed it daily with equal weights of flour and water. If you already have a starter, ensure it’s active by feeding it 8-12 hours before baking.
- Mixing the Dough: Combine water, active starter and flour in a large bowl until combined. Let it rest (autolyze) for about 30 minutes. Then, add salt and integrate thoroughly.
- Bulk Fermentation: Let the dough rise at room temperature until it doubles in size. During this stage, perform a series of “stretch and folds” every 30 minutes for the first two hours to strengthen the gluten.
- Shaping: Turn the dough onto a lightly floured surface, shape it round and place it into a well-floured proofing basket.
- Proofing: Let the dough rise for another one to three hours or until it passes the “poke test,” and when poked, the dough should spring back slowly.
- Baking: Preheat your Dutch oven or baking stone to 450°F. Transfer the dough onto parchment paper, score the top with a sharp blade to allow expansion and carefully place it into the hot Dutch oven. Cover and bake for 20 minutes, then uncover and bake for another 20-30 minutes until golden brown.
If you do not have a Dutch oven, you may bake the sourdough loaf in any pan or even on a pizza stone. Cover the loaf with foil and bake for 20 minutes. Then remove the foil and continue to bake the bread for 20-30 minutes until the crust is golden brown.
- Cooling: Allow the bread to cool on a rack for at least an hour before slicing to let the interior finish cooking from residual heat.
Storing and Enjoying Your Bread
Due to its acidic nature, sourdough bread keeps well. Store it in a linen bread bag for up to three days. For longer storage, slice and freeze the bread, reheating slices in the oven or toaster as needed.
Sourdough bread is incredibly versatile — enjoy it toasted with butter, as a base for sandwiches or simply dipped in olive oil.
If you're a beginner at baking sourdough bread, you may benefit from one of the many kits that can be found on Etsy.
Tags:Country Journal


Acreage Life is part of the Catalyst Communications Network publication family.